
You can get the AD free downloadable PDF version of this pattern HERE
Level: Beginner/Intermediate
If you need any help with this pattern, please feel free to message my Etsy shop, DM me on Instagram @crochetbycolleen OR e-mail me crochetbycolleenUS@gmail.com
This pattern is available for personal use only. You cannot share or sell this written pattern. You can sell your own appliqués but please tag @crochetbycolleen for design credit. Thank you so much for your cooperation!
PLEASE share your makes with me on Instagram! I love to see and share what YOU are making so be sure to tag @crochetbycolleen
YOU WILL NEED
The stitches/ skills you will need to know and KEY:
-
Chain (ch)
-
Slip Stitch (sl st)
-
Single crochet (sc)
-
Double crochet (dc)
-
Half double crochet (hdc)
-
Magic circle
-
Weave ends and finish off.
CROCHET PATTERN
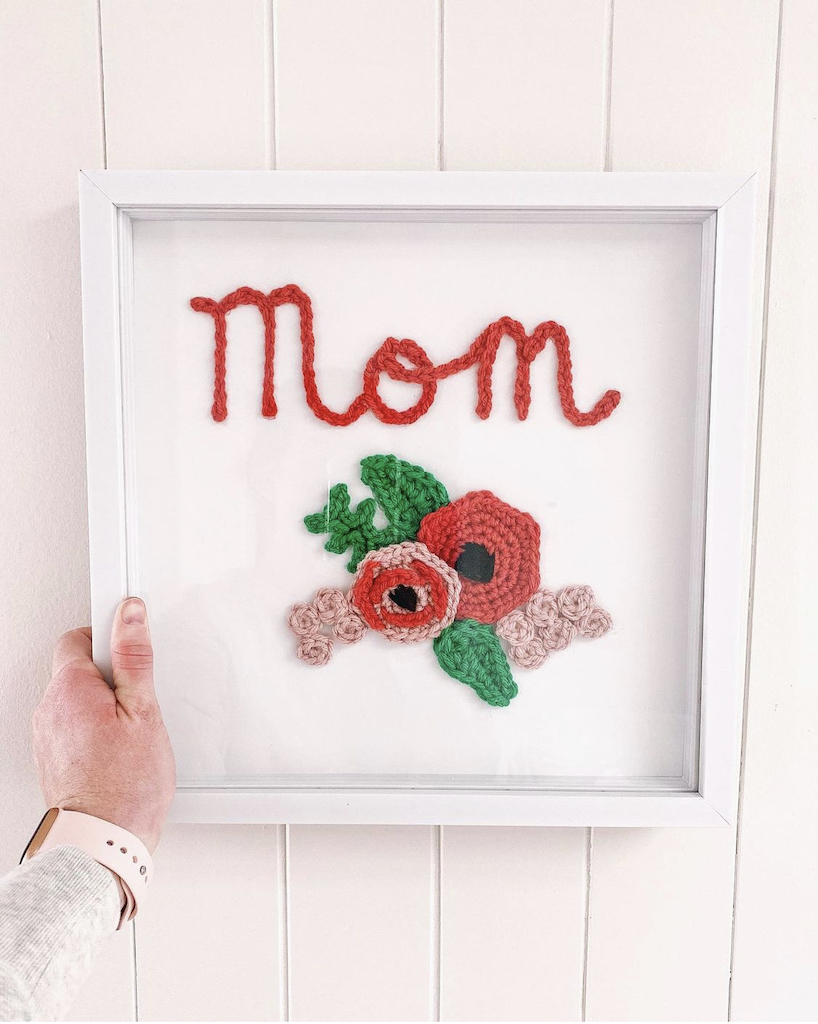
Big Red Flower
Using red or coral on a 5mm hook, make a magic circle
Round 1: Work 6 sc into magic circle – 6 sc. Do not join, continue in a spiral.
Round 2: (2 sc) in each st — 12 sc
Round 3: [(2 sc) in next sc, sc in next sc]— 18 sts
Round 4: [(2 sc) in next sc, sc in next 2 sc]— 24 sts
Round 5: [(2 sc) in next sc, sc in next 3 sc]— 30 sts In this last round every increase (2 sc in the same stitch) you will make those stitches into hdc.
Take a long piece of black yarn and a tapestry needle and sew in the black center.
Smaller Pink Flower
Using light pink on a 5mm, make a magic circle
Round 1: Work 6 sc into ring – 6 sc. Do not join, continue in a spiral.
Round 2: (2 sc) in each st — 12 sc
Round 3: [(2 sc) in next sc, sc in next sc]— 18 sts
Round 4: [(2 sc) in next sc, sc in next 2 sc]— 24 sts In this last round every increase (2 sc in the same stitch) you will make those stitches into hdc.
Take a long piece of black yarn and a tapestry needle and sew in the black center.
Using coral: make 4 separate chains of 5. Hot glue these chains to the flower, use the picture as a guide.
Leaf 1 – Make 2
Using green, chain 7
Sl st in the second chain from the hook, sc in the next two chains, hdc, dc, make 5 tc in the last chain. Now work up the other side of the chain, dc, hdc, sc in the next two stitches, sl st in the last stitch. Finish off and weave ends.
Leaf 2 – Make 1
Use green, chain 7
Sl st into second chain from the hook, chain 3, *sl st in the second chain from the hook, sl st into the next chain,
sl st into the next chain from the original chain 7, sl st in the next chain.*
Chain 3, sl st in the second chain from the hook, sl st into the next chain, sl st into the next chain from the original chain 7, sl st in the next chain.
Now work up the other side of the chain, sl st in the next chain, chain 3 and repeat from *—* until you’re back at the beginning. It doesn’t have to be perfect. Imperfect is probably better, it looks more natural!
Tiny Pink Flowers – Make 10
Using light pink on a 5mm, make a magic circle
Round 1: Work 6 sc into ring – 6 sc. Finish off and weave ends.
Assembly
It might be a good idea to place the lettering first because if you make a mistake you don’t have to worry about redoing all the flowers!
Take a 12 x 12 piece of card stock paper and mark the center with a tiny dot.
Glue the flowers in whatever arrangement you want being mindful of the center. I put mine just below the center mark.
“Mom”
I lightly wrote out Mom with pencil (I practiced on a separate piece of paper first)
Make smaller chains of about 10-15 and glue the chains to each part of the letter. So for the first “M” I glued a piece just on the first line of the M then on the first mountain of the M, then made a separate chain for the second mountain of the M and so on for each letter.
The whole “Mom” was about 8 separate chains instead of making a super long chain and glueing it down, which could be an option, I just didn’t try it that way!
Take your time with the lettering! Especially with hot glue, if you make a mistake there’s no turning back.
Place the piece of card stock into the frame. This frame was great because you can choose which depth you want it to be at. I put it the furthest back.
You can get the AD free downloadable PDF version of this pattern HERE
Let me know if you have any questions! Happy Mother’s Day!


